Make your own NFT collection using Lighthouse + Fantom
Introduction
First, to understand the world of NFTs, you need to understand the underlying technology that makes them possible, because without a blockchain to store NFT information, this world wouldn’t exist.
You’ll have to read Non-fungible tokens to understand what we’re doing here.
Disclaimer: This library is on beta stage, use with precaution and responsability
What’s Fantom?
We will use Fantom as a network to support our NFTs, in this article I will use the testnet but it is exactly the same to reproduce it on the mainnet, so don’t worry about that.
Why Fantom?
Because it is the cheapest and fastest L1 out there, almost free to deploy and really easy to use. You won’t need more than 1 FTM to go through this tutorial.
What’s Lighthouse?
Lighthouse allows users to store their files in a decentralized network for life at a fixed price.
I’m a contributor of the core package and for the ecosystem to be robust we need to get our hands on the ground.
Why Lighthouse?
Because other services are pretty massive so far, with a lot of articles, documentation and people using it, and they also add a lot of “centralized” content in their own way. Lighthouse will remove the friction between you and the IPFS network by making the process for creating distributed assets almost invisible.
Preparation
In this tutorial we will be using Lighthouse CLI but you can translate all of this information into Javascript using the package under the name lighthouse-web3. If you want to make a robust tooling around Lighthouse that’s the best way to do it.
Let’s gets started.
Install the CLI as a global package using:
npm install -g lighthouse-web3
For this tutorial we will be using lighthouse-web3@1.2.7
Creating a wallet
In order to create a wallet you can throw in the terminal after installing the CLI
> lighthouse-web3 create-wallet

Set a password for your wallet: <write your own, and don't forget it!>
Public Key: 0xcE929c41EfCF81cc547D2C3a093915b1Ba904F1A
Wallet Created!
Or you can use an already created wallet importing the private key:
lighthouse-web3 import-wallet --key <private-key>
Both options are OK. In this tutorial I’ll use the CLI but if you have hesitations using the create-wallet command you can create your own by hand using the official Fantom Wallet and then importing the private key.
After that, we should set Lighthouse to use Fantom as default network:
> lighthouse-web3 --chain fantom

Currently using: testnet
Chain set to fantom
Deposit some funds into your wallet
After creating the wallet, we would run a command call balance to check if everything works as excepted:
> lighthouse-web3 balance
0
As we can see, the command throw us a result into the terminal: 0. Obviously we would need to fund this wallet and in order to do this we are gonna use the Fantom Faucet (I showed on my previous article how to fund you wallet using this website)
Have in mind that you can use real FTM to fund this account on the mainnet, this is just for the testnet.
After request to the faucet a few bucks we can throw the balance again and see if something changes (this process usually takes more than 2 minutes)
> lighthouse-web3 balance
10
Now we are ready to upload something on the testnet!
Configure Lighthouse
To not mess up our portfolios and deploy something in the real world we are going to use the testnet, to configure Lighthouse to do that you can go throw the following command to change the network to use the mainnet:
lighthouse-web3 --network testnet
Otherwise, it will use the main network instead
Upload a folder
That’s it, we are ready to deploy something in the chain. The command to drop something is really simple but we would need some preparations beforehand related to the NFTs metadata standards
Metadata structure is, basically, like this
{
  "description": "<you can put a description here>",
  "image": "<any valid url that point to an image>",
  "name": "<you can put a name here>",
}
Obviously you can extend that scheme to have attributes that make your NFT unique, but so far those parameters are sufficient for the scope of this tutorial.
One thing to note is that the image parameter could point to ANY valid url that exists, and that’s a problem because we want our NFT to be as decentralized as possible. We don’t want to store our images in Google Drive (or similar) only to wake up one day and realize they’re gone because we didn’t pay for the subscription plan.
That’s why we are about to deploy this two times.
- For plain images, in order to distribute those images in the IPFS network
- For metadata objects, containing the
imageparameter pointing to the CID of the step 1
Let’s get to work:
First of all, I recommend to rename all the pictures you have by an unique numeric incremental identifier, something like
cat.png -> 1.png
dog.png -> 2.png
elephant.png -> 3.png
This way, having the CID after deployment we can hit and fetch images using only the ID (remember this for the deploy-your-contrat step) and why it’s important to keep track of the id’s.
Once we rename all of the pictures using an identifier we can deploy those into the IPFS network using Lighthouse (I’ll upload a test folder in order to show you how to deploy a folder):
> lighthouse-web3 deploy pictures/test

bafybeigl53pbfhwi7kvsgq66pwtye5v6o5iyso3pp4b32pdulxlykyon5m    2 MB        0.015131840249440111    image/png               1.png
bafybeigl53pbfhwi7kvsgq66pwtye5v6o5iyso3pp4b32pdulxlykyon5m    2 MB        0.015131840249440111    image/png               2.png
bafybeigl53pbfhwi7kvsgq66pwtye5v6o5iyso3pp4b32pdulxlykyon5m    2 MB        0.015131840249440111    image/png               3.png

Summary
Total Size: 2 MB
Fees: 0.005040873106182873
Gas Fees: 98615
Total Fee: 9.861500504087311e-14

Wallet
Address: 0x1449265f3331386F5308eEe40a8b06cdfb1DCCC1
Current balance: 19.680529799801604
Balance after deploy: 19.680529799801505

File Deployed, visit following url to view content!
Visit: https://ipfs.io/ipfs/bafybeigl53pbfhwi7kvsgq66pwtye5v6o5iyso3pp4b32pdulxlykyon5m
CID: bafybeigl53pbfhwi7kvsgq66pwtye5v6o5iyso3pp4b32pdulxlykyon5m
And there’s our precious CID
Now, we can write an script to make .json metadata files to match those same IPFS links. How? by refering the CID and attaching /[id].png at the end of the image url.
Let’s see what I meant with this:
file: index.js
const fs = require("fs");
const path = require("path");

const index = (baseCID,itemsInCID) => {
  const object = (numberOfPhoto) => {
    return {
      name: `Moment #${numberOfPhoto}`,
      description: `Moment #${numberOfPhoto}`,
      image: `ipfs://${baseCID}/${numberOfPhoto}.JPG`,
    };
  };

  for (let index = 0; index <= itemsInCID; index++) {
    fs.writeFileSync(
      path.resolve(__dirname, `${index}.json`),
      JSON.stringify(object(index))
    );
  }
};

// we can use list all the files in the directory of images to
// get the number instead of using a hardcoded 3 here
index("bafybeigl53pbfhwi7kvsgq66pwtye5v6o5iyso3pp4b32pdulxlykyon5m", 3);
After running the script using node index.js we can see that we now have three files under the same directory in .json format and pointing to the IPFS content we deployed earlier.
Now the process is quite similar to the previous one, save the .json files in a separate folder and do the same to upload them using Lighthouse
> lighthouse-web3 deploy pictures/test/metadata
Now, after deploying this we will get another CID that will point to the metadata instead of the image itself. This is useful to make OpenSea, Rarible, Artion, etc. display the correct information for our NFT.
After saving the last CID generated by the CLI we can now go to the contract and mint some NFTs.
Deploy your contract
I wrote this simple contract to deploy NFT using no access-control so don’t use this in production, but for the sake of this article I think it’s more than enough:
// SPDX-License-Identifier: MIT
pragma solidity ^0.8.0;

import "@openzeppelin/contracts/token/ERC721/ERC721.sol";
import "@openzeppelin/contracts/utils/Counters.sol";
import "@openzeppelin/contracts/access/Ownable.sol";
import "@openzeppelin/contracts/utils/Strings.sol";
import "@openzeppelin/contracts/token/ERC721/extensions/ERC721URIStorage.sol";

contract YourFirstNFTContract is ERC721URIStorage, Ownable {
	// usings
    using Strings for uint256;
    using Counters for Counters.Counter;
    Counters.Counter private _tokenIds;

    // declaration of variables
    uint256 public maxSupply = <number of pictures you want to create as NFT>;
    string baseURI;
    string baseExtension = ".json";

    constructor(string memory baseCID) ERC721(<name-of-your-nft-collection>, <your-token>) {
        setBaseURI(baseCID);
    }

    function setBaseURI(string memory _newBaseURI) public onlyOwner {
        baseURI = _newBaseURI;
    }

    function _baseURI() internal view virtual override returns (string memory) {
        return baseURI;
    }

	// needed for the contract to return the tokenURI of the NFT, since we are not using setTokenURI() method
    function tokenURI(uint256 tokenId)
        public
        view
        virtual
        override
        returns (string memory)
    {
        require(
        _exists(tokenId),
        "ERC721Metadata: URI query for token that does not exists"
        );

        string memory currentBaseURI = _baseURI();


       	 // if currentBaseURI exists we return that, if not return empty string
        return bytes(currentBaseURI).length > 0
            ? string(abi.encodePacked(currentBaseURI, "/", tokenId.toString(), baseExtension))
            : "";
    }

	// hit this method to mint an NFT for the address sent as parameter
    function mint(address user)
        public onlyOwner
        returns (uint256)
    {
        _tokenIds.increment();
        uint256 newItemId = _tokenIds.current();
        require(newItemId < maxSupply, "token exceed supply");

        _safeMint(user, newItemId);

        return newItemId;
    }
}
As you can see, the deployment of this contract needs one thing, the ``
We can take the CID we got in the last metadata deployment and put it in the contract constructor before deploying it on the chain.
To deploy it, you can use Ethereum Remix to be able to use your Metamask wallet with the account we created in Lighthouse (importing the private key). You can also follow my previous article to check how to deploy a contract in Fantom without using Remix. If you don’t know how to use Remix don’t worry, it’s quite simple and here is a video tutorial to understand the basics: Introduction to Remix and Solidity
Using hardhat will look like
    const YourFirstNFTContract = await ethers.getContractFactory("YourFirstNFTContract");
    const yourContract = await YourFirstNFTContract.deploy("ipfs://<baseCID>");
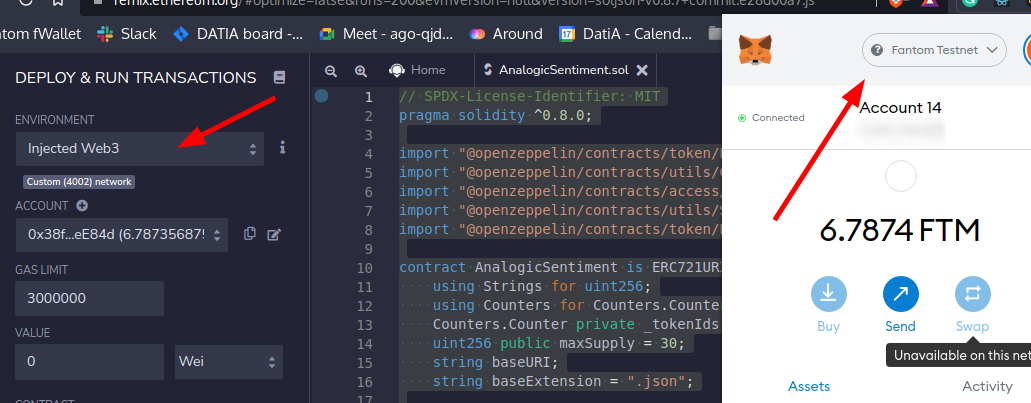
Or using Remix:
First choose Environment as Injected Web3, connect your wallet and change it to Fantom Testnet:
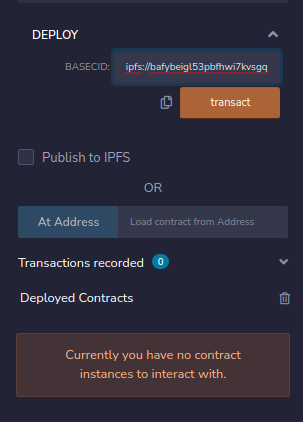
Then, you can deploy it but first be sure to set the baseCID as parameter:
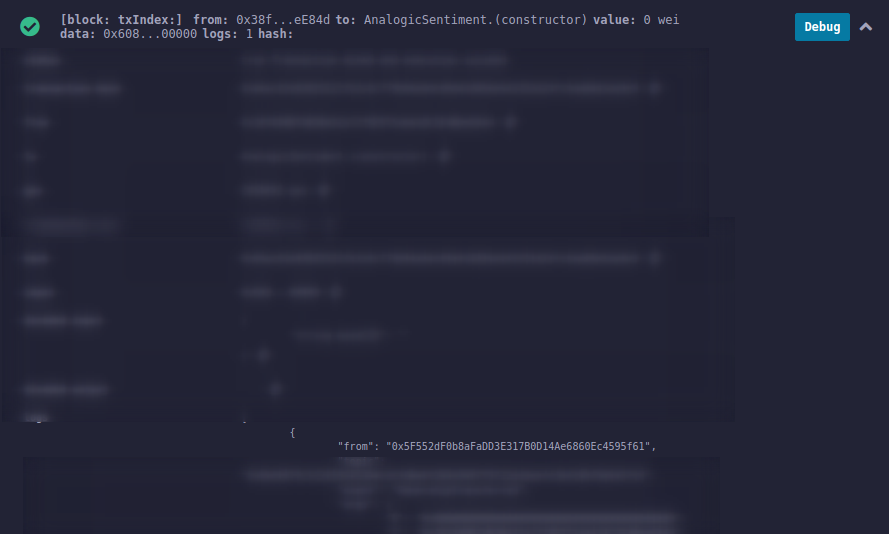
After hitting deploy, you can see the transaction log and spot the address we need on the from: parameter.
Either way, you will get a contract deployed and ready to be minted. To access the contract (spotted on hardhat or remix) you can use the following URL testnet.ftmscan.com/address/{your-contract-address}
Mint an NFT
After getting the address of the contract, you can hit the Read Method called mint(address) (in the ftmscan.com site after you verified it) or use Remix UI to call mint method.
First option will need you to verify the contract, so Remix option is faster in order to try it out
After a succesfully transaction you will be the owner of an NFT!. So now, you can add the contract address and the tokenId of your NFT on your wallet and then you will be able to visualize it.
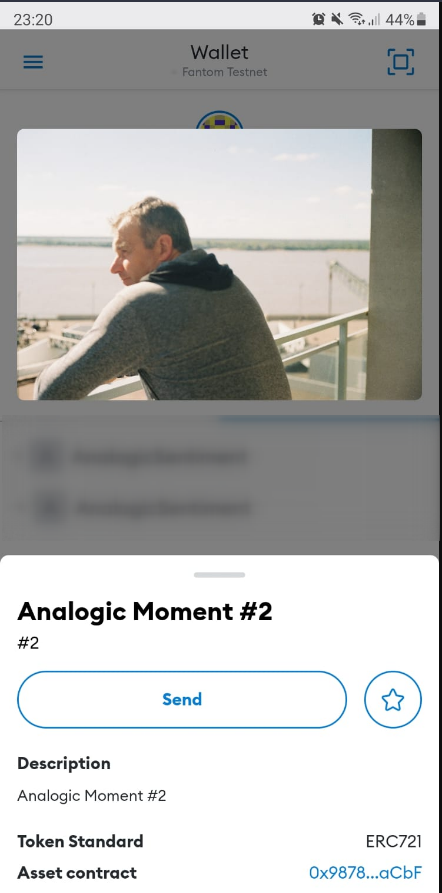
I’m using Metamask Mobile, currently there is no support for the browser extension:
Check it out the following wallets to visualize NFTs:
Next Steps
It is likely that the library will support a command to deploy NFTs using generic contract ER721 to make it easier for users to get in touch with this technology without too much discomfort.
Conclusion
As you can see, deploying a collection in Fantom using Lighthouse is really affordable and also easy for those who don’t have too much experience in the blockchain world. Don’t hesitate to try it out and start playing with Lighthouse + Fantom.