How to deploy smart contracts on Fantom
Why this article?
While researching blockchain development, I went into the Opera Network, known primarily as Fantom and the first thing I noticed, while I was there looking at the documentation provided by the foundation, was the lack of content in terms of how to do things within the network. They put content out there but, as you can read, most of the content is aimed at experts or, at least, people who developed applications on the network in the past.
In situations like this I don’t like to complain too much in my comfort zone because I haven’t done anything to contribute but I was doing a lot of research lately, and working on Bloodgeist and I realize: Why don’t I put some content on the internet by myself?
Baby Steps
I started going through documentation and articles made by people in the community for other networks like Ethereum and they write pretty good content but as I saw, most of the information I found there was for one specific network: Ethereum.
You can say: EVM-compatible networks are the same as Ethereum, just clone the code and that’s it. While half true, the flip side of this is that you have to configure a lot of things in the middle to be successful in deploying something not so novice.
Initial Steps
What I want to do here is to explain how to set up a useful template to develop applications without too many dependencies like Remix or third party services. Luckily for us, we don’t need a lot of complications with Fantom since they expose an RPC network (if you don’t know what RPCs are read on) for us to communicate with the network. There is no need to use services like Alchemy, Moralis or Infura, unless you want to.
I have nothing against these tools that help us learn faster, but once you understand the basics you will need to understand the backbone behind real life projects. You can’t just go around using Remix to deploy contracts (well, technically you can but…).
In favor of those services: it’s a walk in the park for configuring those services and using the accounts without exposing yourself or pushing the wrong changes to the web.
In the opposite side: this services have a pricing quota. Yes, you can use it for free but at the end of they day, you will need to pay.
Let’s Get It On
I’ll explain a little bit tools we are gonna use:
- Hardhat
- Official Wallet from Fantom
- Fantom Faucet
- Fantom Scan for the testnet
- NodeJS to use Hardhat
Nothing more than that, we will create the wallets, fund them with FTM, deploy them using those funds and check the deployed contract.
Hardhat
First of all we are going to need something to develop tools faster in the chain.
You can go off the path of this tutorial and try to choose truffle or brownie if you are more familiar with Python, but in the end it doesn’t even matter, because these tools give us something, in a very similar way: a base to start working on right away. The difference between Hardhat and the others is that Hardhat comes inside an internal network that we can use to our advantage without using tools like ganache.
In our case we are going to create a folder for this project
mkdir fantom-deployment-test && cd fantom-deployment-test
After it, we can throw the following npm commands
npm init --yes # initialize directory for npm
npm install --save-dev hardhat # install hardhat
If you are not familiar with npm, you can revisit this article: Downloading and installing Node.js and npm. In brief, npm is just a package manager for the NodeJS ecosystem.
After doing that, we can throw a command inside the directory we just created:
npx hardhat
Command above will throw us the following setup step:
Welcome to Hardhat v2.0.0

? What do you want to do? …
  Create a sample project
> Create an empty hardhat.config.js
  Quit
Which we will pick the create empty project basically
Hardhat Structure
Seeing projects, big projects, like sushiswap we can spot a few familiar ways of creating the structure we will use in our future projects
/contracts
/tasks
/test
hardhat.config.js
.env
.gitignore
Of course, there is much more in the directory, but don’t pay too much attention to it for now.
We will create the same folder structure in our directory fantom-deployment-test
After creating those folders we will create our main contract, the one we will use to deploy in the Fantom Testnet (exactly the same process for Fantom Opera Mainnet).
file: contracts/Cave.sol
pragma solidity ^0.8.0;

contract Cave {
    string private message;

    constructor(string memory _message) {
        message = _message;
    }

    function messageOnWalls() public view returns (string memory) {
        return message;
    }

    function setMessageInCave(string memory _message) public {
        message = _message;
    }
}
We can see that our contract won’t do too much, but it’s just to show one point: how to deploy something in Fantom.
Also we can write a test to check that our contract works:
file: test/cave-test.js
const { expect } = require("chai");
const { ethers } = require("hardhat");

describe("Cave Test", function () {
  it("Should return the new message once it's changed", async function () {
    const Cave = await ethers.getContractFactory("Cave");
    const caveContract = await Cave.deploy("This is a message from the past");
    await caveContract.deployed();

    expect(await caveContract.messageOnWalls()).to.equal("This is a message from the past");

    const setCaveTrx = await caveContract.setMessageInCave("This is a message from the future");

    // wait until the transaction is mined
    await setCaveTrx.wait();

    expect(await caveContract.messageOnWalls()).to.equal("This is a message from the future");
  });
});
With this we can assure that our contract will work, at least in theory.
You can run the test by using
npx hardhat test
We are ready to deploy something!
Deploying to a live network
If you go and read the hardhat.org article named the same way as this one you can find out how to deploy on Ethereum, but not for Fantom.
I had to take a minute to read the hardhat NetworkConfig documentation to spot some settings we need to use to deploy to Fantom instead of using Ethereum as the default network.
To deploy to the network we will need two things:
file: .env
MNEMONIC="you can put your 12/24 words of a wallet here"
intermediately after, populate .gitignore to prevent misleading pushes to the open web.
file: .gitignore
node_modules
.env
coverage
coverage.json
typechain

#Hardhat files
cache
artifacts
After this we will go to the Fantom Wallet and we will create a Wallet:
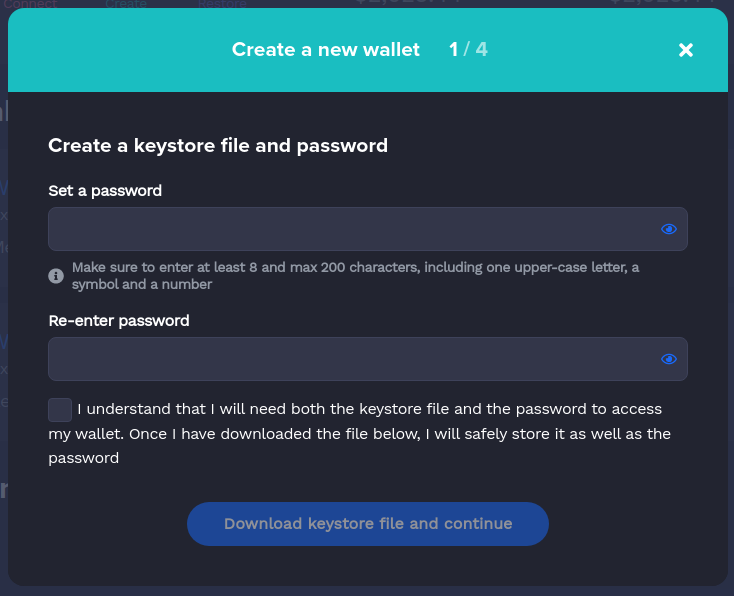
After following the steps, please save your mnemonic (24 words generated) in the .env file we just created. You need to save it using the following string structure:
MNEMONIC="test test test ..."
Doing that, we should be able to spot our wallet address and ask for a few FTM on the Faucet:
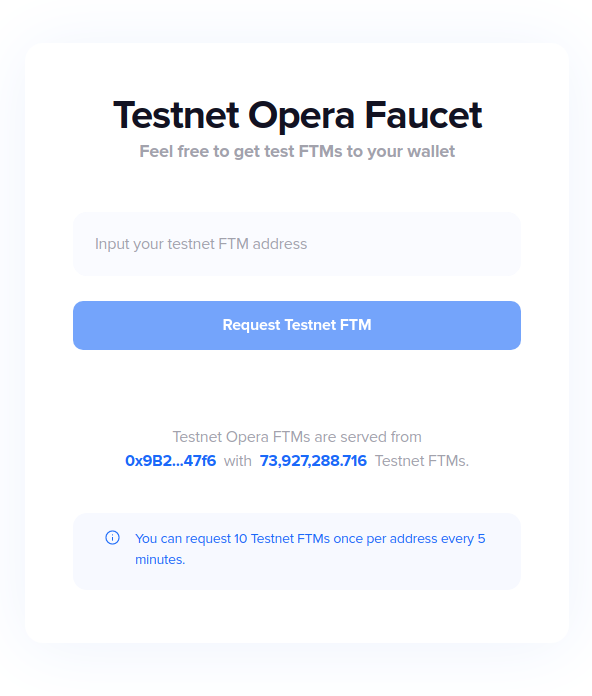
As you can see, you will get 10 FTM on the Fantom Testnet.
Now you can ask, what’s a Testnet?
A testnet is a replica of a chain used for development. It has a similar architecture but the central node validators are inside the foundation and there are no external validators checking transactions inside it. Think of it as an internal test system for you to test your contracts (If you came from software, this would be like an STG environment).
Quick note: if you want to check your balance you can configure Metamask (or any wallet out there) within Fantom Testnet RPC configuration
Okey, there is just one little step to get there:
Configure Hardhat
Hardhat configuration is quite extensive but I’ll show you how setup the basics things you will need to deploy something into the network.
file: hardhat.config.js
require("@nomiclabs/hardhat-waffle");
require("dotenv").config();

const accounts = {
  mnemonic: process.env.MNEMONIC,
};

module.exports = {
  solidity: "0.8.4",
  networks: {
    fantomtest: {
      url: "https://rpc.testnet.fantom.network",
      accounts,
      chainId: 4002,
      live: false,
      saveDeployments: true,
      gasMultiplier: 2,
    },
  },
};
Pay attention to the networks object. There you can specify as many networks as you want as long as they support EVM networks.
For example, Fantom supports EVM so we can use the same configuration we used for Metamask configuration to provide access using hardhat here.
Most important things in the object are:
- url: URL of the JSON-RPC network
- You can use QuickNode as a service here also
- accounts: Account object in the shape of an
arrayorobject- Just to have in mind, if you use
mnemonicthere is no need to useprivate_keyas account reference. Accounts also could be generated using something like HDWallet
- Just to have in mind, if you use
After doing that last configuration we can go ahead and try to deploy into the testnet but we need something more, the latest script:
file: tasks/deploy-to-fantom.js
const hre = require("hardhat");

async function main() {
  // We get the contract to deploy
  const Cave = await hre.ethers.getContractFactory("Cave");

  // We set the constructor of the contract within a message
  const caveContract = await Cave.deploy(
    "This message will be painted on the walls, forever!"
  );

  await caveContract.deployed();
  console.log("Cave deployed to:", caveContract.address);
}

main()
  .then(() => process.exit(0))
  .catch((error) => {
    console.error(error);
    process.exit(1);
  });
After saving the file, run
npx hardhat run tasks/deploy-to-fantom.js --network fantomtest
Important Note: name of the network needs to match with the network name you specified in the hardhat.config.js. In this case, is fantomtest
If you are lucky and followed the steps well, you will receive a message saying
Cave deployed to: <address>
Take the address before CLS the terminal and check it out in the FTMScan Testnet if get deployed or not:
https://testnet.ftmscan.com/address/<address-from-terminal>
If you have found your contract, congratulations! You have just deployed your first contract in Fantom (testnet). Try to manipulate the contract, do some transaction, verify it, play with it for a while and understand what we did here to make it happen.
Conclusion
In this article you have learned how to code and deploy a simple but concise contract on the Fantom network.
If you want to continue reading about contracts, deployments, verification process, etc, you can keep visiting the links I was posting here in this article as a source of related information.
Thanks for reading!